
I've been building webtomarkdown.com to have a tool that allows me to convert various type of content to Markdown so I can pass it to LLMs (Markdown is the language of LLMs).
I started with microsoft/markitdown which is a really nice and fast library. But it does poorly on PDF that are beyond basic text e.g. tables, images etc. In my research and trying it out I see the DS4SD/docling does a lot better in extracting content from PDF. One of the reason it is able to do it is because they trained a neural network based model huggingface/ds4sd/docling-models which takes an image and extract the content.
Running it requires GPU and Cloud-based GPUs, come with a hefty price tag. I don't want to pay for it, when the primary user of the tool is myself and maybe few who explore it. I wanted to tap into my home rig (packing a 4090 and a 3090) which I currently use for Local LLMs and want to utilize it for this.
The big question: How do I expose my home server to my cloud environment without throwing security out the window?
The answer: Docker and Tailscale. Below is how I set it up, keeping GPU usage cheaper and my machine safe from unwanted traffic.
Using Tailscale for Secure Networking
Tailscale provides a simple, secure VPN solution built on WireGuard. It allows devices to connect directly and securely, forming a mesh network that's perfect for securely linking to machines. In this case two containers
- I have my actual service deployed in Digital Ocean Droplet with Docker Compose
- I want to expose service from my home GPU server only for docling, wrapped in a different service.
- The home GPU server shouldn't open any ports to public internet but rather my container in Droplet should connect to container in my home server using a VPN (Virtual Private Network).

Setup Tailscale
Tailscale for various tasks, but isolation is essential to ensure each device only accesses what it should. Tailscale’s Access Controls (ACLs) help you achieve this. By combining tags and ACLs, you can ensure that in this scenario, two containers only have access to each other—and not the rest of your network—effectively containing potential security issues within those containers.
ACLs function by letting you specify explicit rules for what can communicate with what, while anything not covered remains off-limits.
The following rules allow containers tagged as your-svc-tag to communicate only with each other, unless other rules permit additional connections
//Allow traffic from devices with tag:your-svc-tag devices with same tag
{
    "action": "accept",
    "src":    ["tag:your-svc-tag"],
    "dst":    ["tag:your-svc-tag:*"],
},
Setup Docker with Tailscale
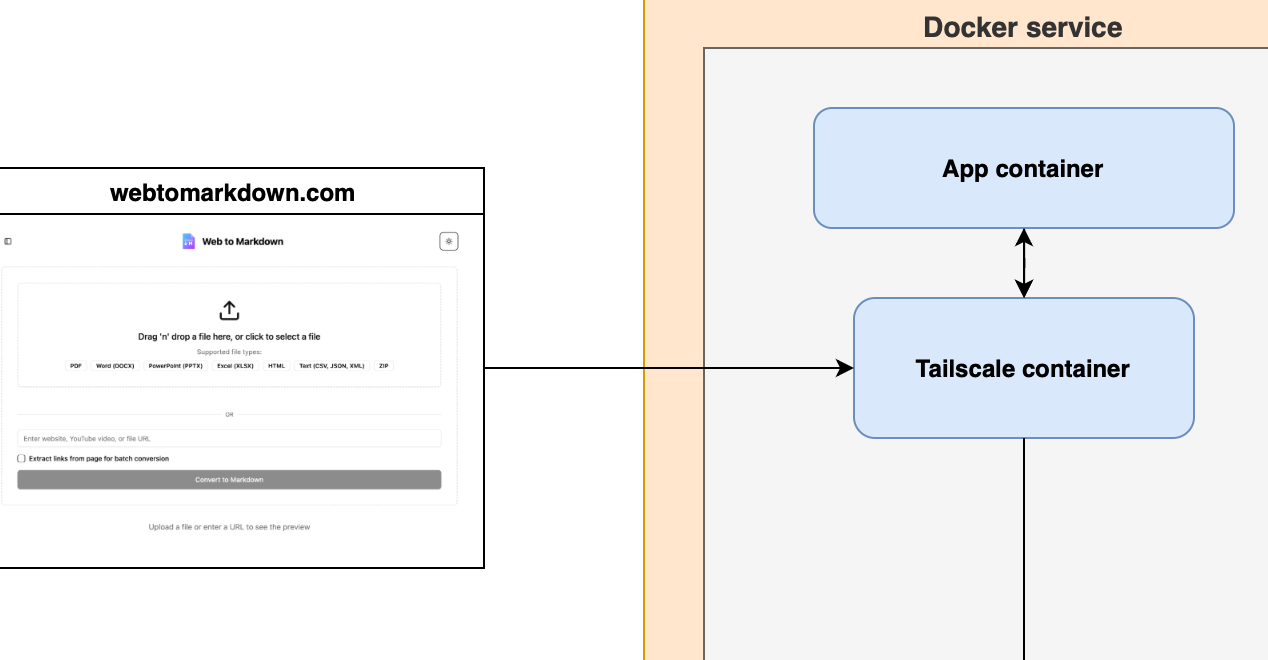
The way your Docker container works with Tailscale is that you have container for Tailscale that is handling the networking and then your app container uses the network through the Tailscale container.
Following is the example of docker-compose.yml file that I use for my home machine which has the GPU that I want to expose to my Digital Ocean Droplet VM
version: "3.8"

services:

  app:
    container_name: your-service-name
    # ... (other properties)
    environment:
      # ... (other properties)
      - NVIDIA_VISIBLE_DEVICES=all
    deploy:
      resources:
        reservations:
          devices:
            - driver: nvidia
              capabilities: [gpu]
              device_ids: ['0']
    depends_on:
      # ... (other properties)
      - tailscale
    restart: unless-stopped

  tailscale:
    image: tailscale/tailscale:latest
    hostname: name-of-service-host
    environment:
      - TS_AUTHKEY=${TS_AUTHKEY}
      - TS_HOSTNAME=name-of-service-host
      - TS_EXTRA_ARGS=--advertise-tags=tag:your-svc-tag
      - TS_SERVE_CONFIG=/etc/tailscale.config.json
    volumes:
      - /var/lib:/var/lib
      - /dev/net/tun:/dev/net/tun
      - ./config/tailscale.config.json:/etc/tailscale.config.json
    cap_add:
      - NET_ADMIN
      - NET_RAW
      - SYS_MODULE
    restart: unless-stopped
Here some of the key things are
- TS_AUTHKEY: This is auth key you generated for this purpose. We'll talk more on how to generate one.
- TS_HOSTNAME: This is what you will use to connect to this node, also what shows up in Tailscale Dashboard
- TS_EXTRA_ARGS: It indicates that when Tailscale daemon is started then it advertises the tag that you created for this purpose. This is important as that is what will allow ACLs to work properly.
- TS_SERVE_CONFIG: This is the Tailscale config, which will allow you to serve selected ports so that the Droplet can access it. You will be connecting to this service using name-of-service-host:PORT.
Tailscale config
The tailscale.config.json will be dependent upon how your service is setup, but for basic 8080 hosted service you can use something like following
{
  "TCP": {
    "8080": {
      "HTTP": true
    }
  },
  "Web": {
    "${TS_CERT_DOMAIN}:8080": {
      "Handlers": {
        "/": {
          "Proxy": "http://app:8080"
        }
      }
    }
  },
  "AllowFunnel": {
    "${TS_CERT_DOMAIN}:8080": false
  }
}
Generate Auth Key
You can go to Tailscale Settings and then click on "Generate Auth Key", to see the following dialog where you need to select various settings
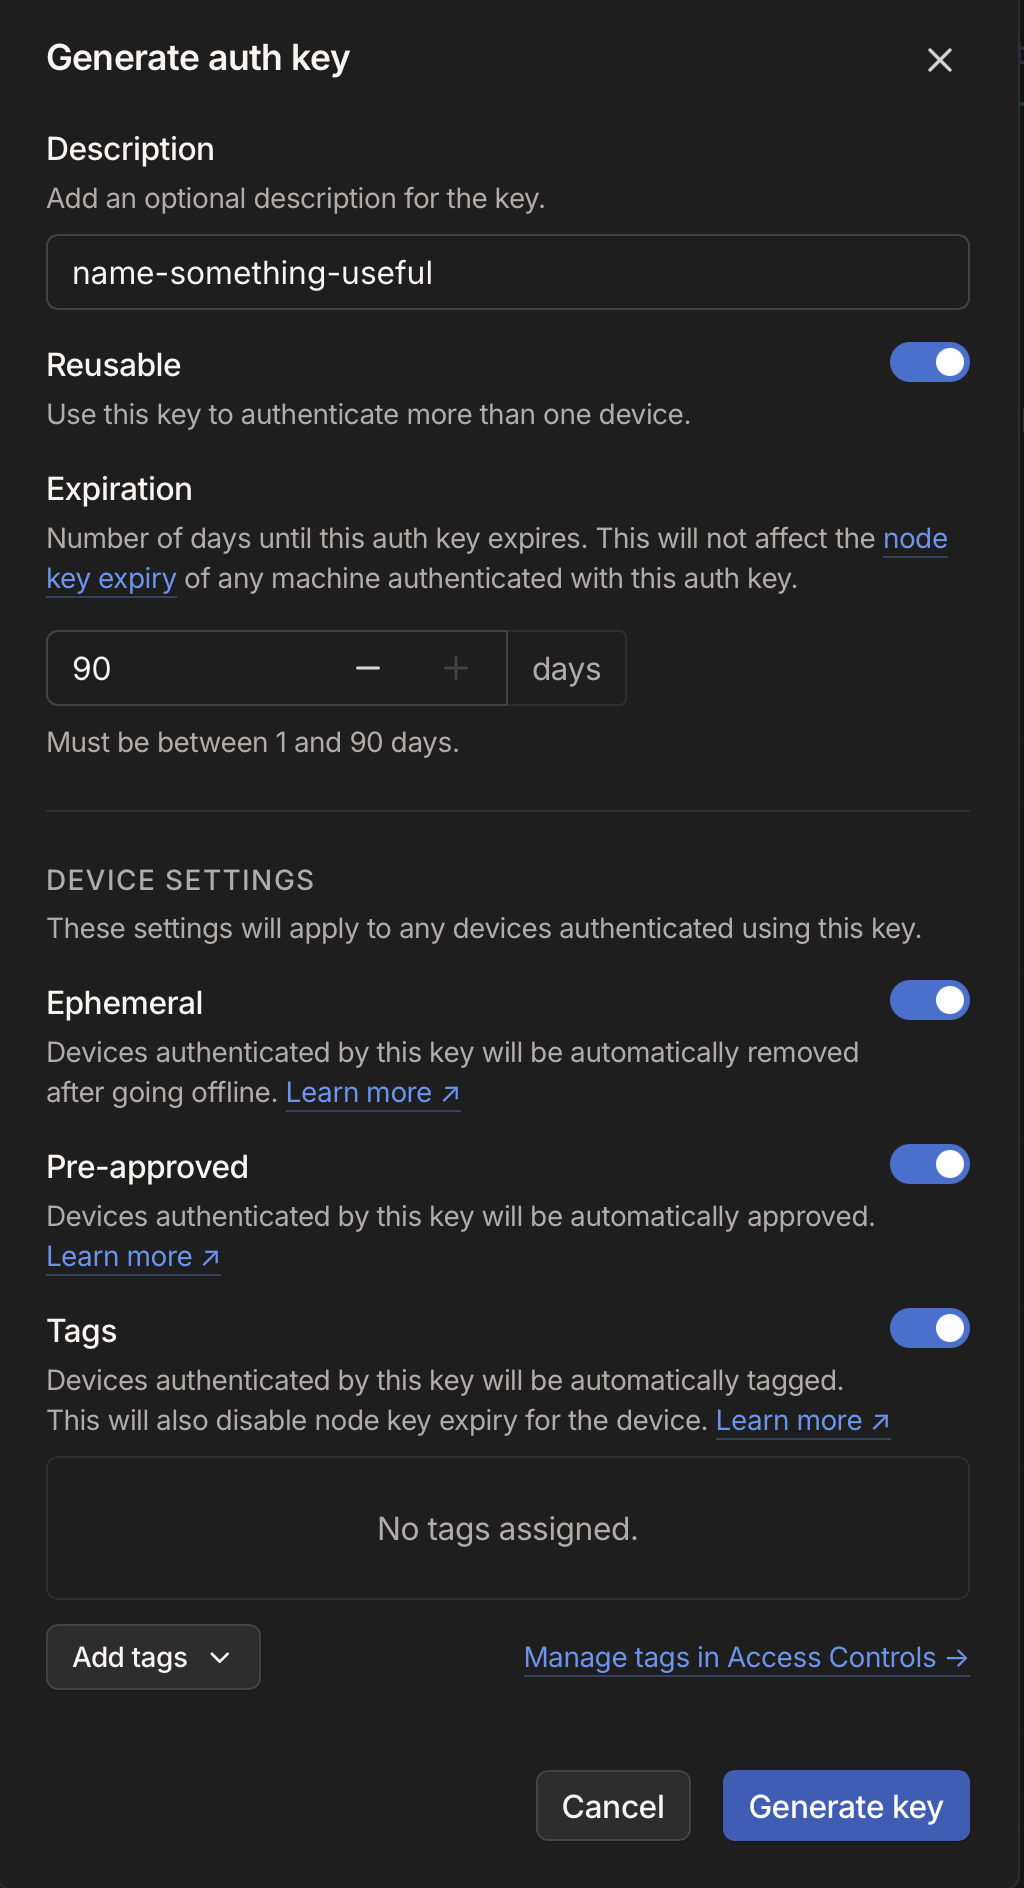
- Reusable: As your container can start again, I believe this is needed so auth key can be reused when you deploy an updated container
- Ephemeral: If you restart/create new container and old one goes offline then it gets auto-removed
- Pre-approved: This is up to you depending if you want these containers to automatically connect or need your explicit approval whenever you restart it.
- Tags: Select the 'your-svc-tag' here
- Expiration: Set whatever you are comfortable with but be aware that if you start a new container after the expiry time, Tailscale will fail to connect and you would need to generate a new auth key.
Host discovery
Although you’ve set a hostname for your service, when containers restart, they connect to Tailscale with an incrementing suffix. For instance, if your hostname was foobar-hostname, it might register as foobar-hostname-1, and so on.
To identify the correct hostname to connect to, you need some form of host discovery. One approach is using Tailscale APIs to find an online node whose hostname begins with the given prefix.
import requests
from datetime import datetime, timezone
from typing import Optional, List

class TailscaleDiscovery:
    def __init__(self, api_key: str):
        self.api_key = api_key

    def find_node(self, name_prefix: str, max_idle_seconds: int = 300) -> Optional[str]:
        """
        Find the most recently active Tailscale node matching the given prefix.

        Args:
            name_prefix: Prefix to match node names against
            max_idle_seconds: Maximum seconds since node was last seen (default: 300)

        Returns:
            str: Hostname of the matched node, or None if no match found
        """
        try:
            # Fetch all nodes
            response = requests.get(
                "https://api.tailscale.com/api/v2/tailnet/-/devices",
                headers={"Authorization": f"Bearer {self.api_key}"}
            )
            response.raise_for_status()
            nodes = response.json()["devices"]

            # Filter and sort matching nodes
            matching_nodes = []
            now = datetime.now(timezone.utc)

            for node in nodes:
                # Skip nodes that don't match prefix
                if not node["name"].startswith(name_prefix):
                    continue

                # Check if node is recently active
                last_seen = datetime.fromisoformat(node['lastSeen'].replace('Z', '+00:00'))
                if (now - last_seen).total_seconds() > max_idle_seconds:
                    continue

                matching_nodes.append(node)

            if not matching_nodes:
                return None

            # Return hostname of most recently seen node
            return sorted(
                matching_nodes,
                key=lambda n: n['lastSeen'],
                reverse=True
            )[0]['hostname']

        except Exception:
            return None
In this code, you retrieve the list of devices, filter those matching the provided prefix, and check when each device was last seen (i.e., the most recent time it was online).
You can adapt this further to cache domain information. If you have multiple machines, you could implement a round-robin approach to distribute requests. Once you identify the correct Tailscale hostname, you can simply call your service.
Some issue I ran into
when running Docker inside it. I couldn’t get the Tailscale container on the Droplet to function properly—particularly for DNS resolution. Instead, I ended up configuring Tailscale directly on the Droplet (with the Auth Key, Tags, etc.) and then set my container to use the host network:
services:
  app:
    # ...(othe properties)
    network_mode: host